Wednesday, March 30, 2011

Master bathroom (incomplete) details:

This is one of those instances where I debate whether to show pictures of an "incomplete" room or not. I like everything to be perfect before I share with the world. With this room, the bones are done, but there is still quite a bit of accessorizing left to do. But in blogland, it seems that people are interested in the "process," so here we go.

First of all, a little backstory. When we moved into the rental last year, we "graduated" to two bathrooms. So I decided I wanted the master bathroom to feel "spa-like." I said that, but really, besides buying some brown countertop accessories (tissue box, soap dispenser, toothbrush holder, etc) and some brown and teal towels, I didn't do any decorating. Rental houses feel so temporary, that it can feel like a waste to decorate too extensively. So here are some pictures of my "spa-like" bathroom at the rental house (if you can even call it that!):


But at least it got the wheels turning on this "spa" idea, and I am definitely taking it up a notch with our new master bathroom.

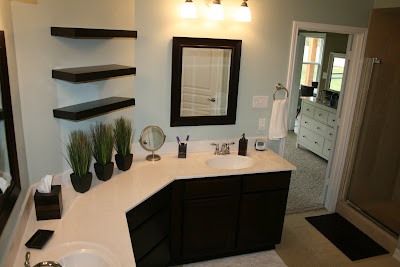
So come and enjoy a relaxing visit to Spa Jones:


Those empty floating shelves on the wall are basically the reason I hesitated to share pictures of this room. But imagine rolled white towels and a few accessories adorning the shelves. I will publish pictures once I have them finished.

Other projects down the road are adding moulding around the window and a chandelier above the bathtub:


I am also asking Nick to build me a long box to hold rolled towels that will go above the bathtub, just like in the following picture. Hopefully he can also build me the cute little bath tray:


Now for some details.

I found these plants at Kohl's (who would've thought?). They scream "spa" to me.


Love how the wall color really makes the white towels pop.


No spa is complete without bathrobes. Ours our hung on hooks labeled with our initials:


When I was looking for inspiration for my "spa bathroom" (I really needed it since I have never actually even been to a spa!), I stumbled across these accessories, and fell in love. I made up my mind that no spa bathroom would be complete without a dark brown wooden mat. How very zen!


Slight problem, the one pictured comes in two sizes. The smaller version is $200, the larger version is $400. Ouch. So I searched online for other options. But I could only find light wood, no dark wood.

And then, oh glorious day! I stumbled across this wooden bathmat at Target, for $20.


Obviously, it wasn't the right color. But that is nothing that a little stain can't fix. It took about six coats to get the deep expresso color I was after, but the finished product is oh-so-lovely (and sooo much less than $400):


And that concludes your visit to Spa Jones. Come again soon!

Guest bathroom details:

The guest bathroom is really just a painted version of the bathroom we have had since we got married. Everything in this bathroom was stuff we received as gifts from our wedding registry. And I am happy to report I still love all of it today. (Decorating-wise I am always wanting to change things up, so that is quite an accomplishment.)

For old time's sake, here was our very first bathroom in the apartment:


And here is the rental house's guest bathroom:


And now it looks like this:


So not much has changed, but I must say, the painted walls do add some depth to the room! And I lovelovelove our dark brown vanity, it makes the white countertop really stand out. Having a framed mirror (rather than builder-grade) also makes a huge difference.

One thing you will notice that is lacking in our new house is a cabinet over the potty! It has been sorely missed in this new house, and installing one is definitely on our to-do list. I can't wait to have that storage space back!

So now for the detail shots.

I love the soothing colors of the shower curtains and all of my mother-of-pearl accents, like the pretty curtain hooks:


And the frames with two of my bridal portraits:


The pretty coordinating towels:


And all of the mother-of-pearl accessories (all from Target, circa 2008):


What do you think? Not bad for a room that cost me nothing more than a $20 gallon of paint and a $60 framed mirror.

Sunday, March 20, 2011

So what did you do over spring break?

I painted two bathrooms and went to San Francisco in between :)

I am so glad to have the bathrooms painted. That is something that has been hanging over my head since we moved in. In my typical "I can do anything" mentality, I unrealistically assumed that we would be able to paint both bathrooms, plus the living room ceiling, plus the kitchen, plus the master bedroom on closing day. Obviously, that was not a realistic expectation, and we only got to the living room and kitchen that day. We painted the master bedroom the following week, and the bathrooms have just been hanging over my head for nearly 3 months, waiting to be painted.

We got up early last Saturday, and were done with painting the guest bathroom by lunchtime! Yeah! Gotta love small rooms.


Paint color look familiar? Like, maybe the kitchen color? Well, not quite. Its the same color, but I had them mix it 50% lighter this time around. Its a bit more serene and not so "in-your-face" teal.


Halfway through painting, after much debate, I had to break the bad news to Nick: I wanted to paint the ceiling (you know he especially loves painting ceilings).

I am so glad we painted the ceiling. It makes the room look so much taller because your eye doesn't abruptly stop when it hits the white ceiling. Now that I see how much better it looks, I want to paint every ceiling.

So after checking painting the guest bathroom off our to-do list, we hopped on a plane and headed to San Francisco for a week with my family:


Lots of fun was had by all, although it was cold and rainy most of the time, which is definitely not my favorite type of weather!

We headed back Friday afternoon, and Saturday it was back to painting. While the guest bathroom was a fairly quick project, the master bathroom most definitely was not. Man, that room is a lot bigger than you think it is. It was pretty much an all-day, no-fun project. But I sure am glad it is done!


This is just a picture of our pretty moulding. This is the one place in our entire house where the builder put up moulding.


The sole reason for the following picture is to point out that I had to paint all of this too (the ceiling in the shower and the entire "toilet room"). And I say "I" because Nick did not help me with either of these undertakings (though he was a huge help with painting the rest of the bathroom!).


We will eventually install a above-the-toilet cabinet above this area some day:


So this concludes my spring break. How was yours?

(p.s.: Read about all the fun decorative details of both bathrooms here and here.)


HOUSEography House Tour Link Party

Monday, March 7, 2011

Pantry wars:

If you would ask me what the number one thing that has disappointed/annoyed/enraged me about this house, it is this:


Yes, that tiny little half-door is our pantry. To be honest, I never even really THOUGHT about the pantry when selecting our floorplan. Our rental had an AWESOME, huge pantry. Yet another thing I apparently took for granted.

One of the things I like about our builder is that they have so many floorplans that every house in the neighborhood is different (and even if you pick the same floorplan, you can change it up and customize it). But the downside to that is that they don't have every floorplan available to view, which means we did not see the inside of an actual house with our floorplan before we started building. If I had, I would have definitely changed the pantry (it would have been easy to take away a few feet of the laundry room to the left to add more space to the pantry).

We are not at all the type that "stock up" on groceries. We basically only buy what we need for that week. And yet, this is what the inside of our pantry looked like when we first moved in:


Despite my best organizing efforts, it was so crowded. Things were stacked four-deep on those tiny shelves. You would have to move a whole pile of stuff in order to get to what you need, which drove. me. crazy. I am someone who HATES clutter, I need to have open spaces.

I knew this would have to be one of the first projects we tackled, since this just wasn't a "liveable" situation. The issue is, in such a tiny area, how do you add more space?

I decided to add more shelves to one of the side walls (to form an "L" shape with the existing shelf). So this is where my newly-converted handyman husband came in.

He built:


I painted:


Once the paint was dry, I tried once again to organize the pantry utilizing my new "L"-shaped shelves. But, surprise, surprise...it still wasn't enough. So, even though we knew it would make the pantry very tight, we added shelves to the other walls (to form a "U" shape).


Once they were finally done, I got to organizing. While the situation is still not ideal, I now have SPACE!! You can actually see things, and there is (a little) room-to-spare.


Some might say I have a few spices:


It's definitely still a work in progress. I am planning to slowly start buying more containers to store things like pasta, rice, cereal, etc. And maybe one of those two-step organizers for the spices and canned goods.

Of course, this is the dream:


One day I plan to wallpaper the back shelves. You know, once a hundred other things I want to do are done! Oh, one day! :)
 

Copyright 2008 All Rights Reserved Revolution Two Lifestyle theme by Brian Gardner Converted into Blogger Template by Bloganol dot com