
Friday, October 28, 2011
New URL
For some reason, Blogger has begun to act up, and this page takes about 100 years to load, so I have moved everything over to Wordpress. From now on, please join us there: http://jenandnickjones.wordpress.com/
Saturday, July 9, 2011
Quick update:
I'm sorry posts have been so few and far-between lately. You can once again blame it on my perfectionistic tendencies that don't like showing things until they are 100% "finished." But I am starting to realize that may not happen anytime soon, so I need to update you all with some "progress posts" instead.
One room-in-progress is the hallway. This "room" has been pretty much neglected since we got here, aside from three frames that I had in our rental house's hallway. I decided last year that I wanted to start a tradition of adding a new photo each year to our hallway to form a gallery wall of sorts. The photo in the frame is representative of the biggest event or change from that year. So in 2008, it was a wedding photo. In 2009 it is a "family" photo of us with Lucy, and the most recent one is a picture of us in front of our house. Who knows what 2011 will hold!

Other than that, this hallway has sat pretty bare for the first six months we've lived here. I finally got some inspiration to start warming it up a bit. Honestly, I had never even really noticed these two lights. But, it occurred to me, that hanging something dramatic could really help the space seem more special, especially since the ceiling is pretty high.

I decided to go with a light I've been dreaming of since before we even moved in (see this post) from good ole Pottery Barn.

One tip I've learned is before you make a purchase on lighting, GOOGLE AROUND! I copy and pasted the name of the light, and ended up finding some for sale of eBay for considerably cheaper. Same exact light, and the box had never before been opened. Yes, please. We ended up saving over $100 for the two of them.
So now our hallway looks like this:

(Not the best picture I know. I found it quite challenging to photograph this long, narrow hallway in its entirety. )
Notice there is now also a runner rug as well. That did a lot for warming the space up. As for how I settled on this rug, well... I really only could pick from a handful of options, because this space required a 12-footer and those are not exactly easy to come by (8-foot is most common). So out of the ones I found (mainly searching Overstock.com) this was my favorite one. I thought the stripes gave off a certain "elegant beachy" vibe that I am generally going for throughout the house.
So now I am thinking of how to "finish" the hallway. My immediate thought was adding chair-rail and board and batten to both sides, but many years down the road I worry about running out of space for our growing gallery wall. Also--paint color. Before I got the rug, I was thinking grey. Now I feel like the rug kinda necessitates more of a golden, warm color. What would you do?
Sunday, June 19, 2011
A post on gardening...
I guess it helps to see how far you've come. Because I was going to write this post about how I am just not cut out for gardening. It requires too much patience, and I am more of the instantaneous results type, rather than the "wait 5 years until the plants fill out" type. Also, I feel like there is some secret to gardening that I don't quite get. Something I am not doing that always makes my plants look pathetic and shriveled (doesn't help that it has only rained twice...seriously, TWICE, since we moved in January 14). Also...garden planning. I feel like I am taking shots in the dark when it comes to picking plants. I have a plan...somewhat. But who knows how it will eventually all look together (ya know, once it fills out in 5 years!).
But then I found this picture:

Minus the three little flowering plants up at the top left (which I added the day I took the picture), this was how our garden looked when we moved in. This was the "landscaping" our builder did for us.
Funny how you forget how puny things once were. I tend to focus on the imperfections, rather than seeing how far we've come.
So here it is today (along with a little Americana I just added for the 4th of July today):

So although I am disappointed because it is not the in-full-bloom, overflowing, colorful garden of my dreams, I guess I should just be proud that in this extreme drought we are having right now everything is still (sort of) green. I kept waiting until everything looked perfectly in bloom to do this post, but I finally realized that just ain't gonna happen this year. Maybe next spring.
So here's a breakdown of my gardening so far:
My goal is to have a pretty, overgrown cottage garden. Something kind of like this:
Only, I want to use a color scheme of just purple and white. I only planted perennials this year, because they seem to be the most efficient time-wise and cost-wise. I am starting to learn however, that annuals are probably the key to that blooming pop of color that I am looking for, so my goal is to form the perennial base this year, and next year I will add in some annuals wherever needed.
So thats pretty much the extent of my plan when it comes to going to the nursery and selecting plants: purple or white perennials. I've also tried to get things that bloom at different times so that something will always be blooming. But really, its just because the garden centers tend to bring in plants when they bloom, so if you buy a little at a time over a span of many months (as I have) that kind of happens by default.
So to start with, I brought in some emerald blue creeping phlox in March. I planted it completely around the perimeter of the flower bed (in between the monkey grass the builders put in).

I was sooo excited about this plant because it has a habit of spreading. So I had big dreams of this:

...quickly turning into something like this:


But then I found this picture:

Minus the three little flowering plants up at the top left (which I added the day I took the picture), this was how our garden looked when we moved in. This was the "landscaping" our builder did for us.
Funny how you forget how puny things once were. I tend to focus on the imperfections, rather than seeing how far we've come.
So here it is today (along with a little Americana I just added for the 4th of July today):
So although I am disappointed because it is not the in-full-bloom, overflowing, colorful garden of my dreams, I guess I should just be proud that in this extreme drought we are having right now everything is still (sort of) green. I kept waiting until everything looked perfectly in bloom to do this post, but I finally realized that just ain't gonna happen this year. Maybe next spring.
So here's a breakdown of my gardening so far:
My goal is to have a pretty, overgrown cottage garden. Something kind of like this:

Only, I want to use a color scheme of just purple and white. I only planted perennials this year, because they seem to be the most efficient time-wise and cost-wise. I am starting to learn however, that annuals are probably the key to that blooming pop of color that I am looking for, so my goal is to form the perennial base this year, and next year I will add in some annuals wherever needed.
So thats pretty much the extent of my plan when it comes to going to the nursery and selecting plants: purple or white perennials. I've also tried to get things that bloom at different times so that something will always be blooming. But really, its just because the garden centers tend to bring in plants when they bloom, so if you buy a little at a time over a span of many months (as I have) that kind of happens by default.
So to start with, I brought in some emerald blue creeping phlox in March. I planted it completely around the perimeter of the flower bed (in between the monkey grass the builders put in).

I was sooo excited about this plant because it has a habit of spreading. So I had big dreams of this:

...quickly turning into something like this:

Unfortunately a few short weeks later, it lost all of its blooms. Its still green, but is not the large, spreading plant I hoped it would be. I still have big hopes for it next spring though.
So then I got some free ferns from work (we use them as decoration for events, then afterwards they are up for grabs). I am not a huge fan of ferns, but I took them because I thought they would fill out the garden and serve as a sort of placeholder while other things grow. As we have added new plants, these ferns have changed location quite a bit, as you will notice in the following photos. Hardy little guys, these ferns are.

My original plan for the garden was one layer of purple circling the perimeter, then a layer of white, then a layer of purple, and so-on...
So I added some white armeria behind the creeping phlox:


I'm actually not really a fan of these. They never filled in, looked quite stringy and their blooms die and turn brown really fast. So I found another white perennial (candytuft--also labeled as spreading, yay!) and tried to fill in more of this section with it.
I actually give candytuft a much more favorable review. It bloomed for much, much longer. Only now is it beginning to fade.

I also brought in some climbing vines for the side of the house (moving these trellises was actually the culprit of my broken ceramic flower fiasco). The vines are Star of Jasmine and smell divine. They've done quite well and are growing at a good pace.


So here is all of that (probably early April). You will notice my creeping phlox in the front had already lost its blooms :(


Next, I brought in my favorite plant out of all of them (and ironically the only one I didn't take a good picture of): Lo & Behold Blue Chip Butterfly Bush. This is a miniature version of the butterfly bush, and should only grow to about 2-3 feet high. It is continuously blooming from summer to frost. The only unfortunate part is that in between purple blooms, you have these ugly dried grey blooms (which is why I didn't get a picture of them). Here is a picture of the plants from the internet:

This is actually a very appropriate picture, because I hope one day (in oh, 3 to 5 years!) my garden will look just like this. I planted a white hydrangea bush right behind the butterfly bush, just like in this picture.
And speaking of, white hydrangea are not exactly easy to come by. I ended up having to order it online. I opted for the biggest (and most expensive) size, and was really hoping it would come to me looking like a semi-substantial bush. What a huge disappointment. I opened it up and found a sad, shriveled, TINY plant. Luckily it seems to be flourishing now, but it will be many years before it will look anything like the picture above.

I also planted a gardenia bush:

A Texas Lilac shrub:

Some Mealy Sage (this stuff has grown like a champ! It has nearly tripled in size! If all plants had these results I would find gardening a lot more rewarding!) Not sure why it has white blooms though, the picture on the card acted like it would be purple. Maybe eventually it will turn!)

And just yesterday I added some pretty purple Cape Plumbago:

So thats where I am with that garden. I haven't even touched the bed on the other side of the house, except for one little experiment. I have had a couple of different seed packets sitting around for years (gotten from the most unusual of sources, for example, some Forget-Me-Not seeds from a funeral home!). So I dug a hole, threw them all together and just waited to see what happened. Not the best gardening approach I am sure, but a few weeks later, look what sprung up:

And a month or two later, blooms!

That is a mix of Sweet Peas, Cosmos, Forget-Me-Nots, and Cleome Spider Flowers.
So thats more than anyone ever wanted to know about my gardening adventures this year. I am just hoping and praying all of my efforts will pay off next spring (and that this Texas heat-wave and drought doesn't kill all of my plants in the meantime!)
Sunday, June 5, 2011
Gettin' knobby with it
(Title sung to the tune of Will Smith's ever-classic "Gettin' Jiggy With It"...sorry couldn't help myself!)
This was a super-easy, relatively cheap project that was primarily about adding function. We added knobs to all of our cabinets/drawers. Yay for no more hurt fingers as you try to pull the drawers open from the edge!

We decided to go with simple knobs for everything. Mainly because I like the simple, uncluttered look. I actually hesitated quite a bit to add the knobs at all, because I hated to loose that clean look. But as I said, this project was more about adding function, rather than aesthetics.
We went back and forth over whether or not to add handles to the drawers like the ones pictured on the left and right here:


I didn't get any laundry room pictures, but here are the two bathrooms before-and-afters.

This was a super-easy, relatively cheap project that was primarily about adding function. We added knobs to all of our cabinets/drawers. Yay for no more hurt fingers as you try to pull the drawers open from the edge!

We decided to go with simple knobs for everything. Mainly because I like the simple, uncluttered look. I actually hesitated quite a bit to add the knobs at all, because I hated to loose that clean look. But as I said, this project was more about adding function, rather than aesthetics.
We went back and forth over whether or not to add handles to the drawers like the ones pictured on the left and right here:

In the end, I counted all of the cabinets and drawers we would be doing (in the kitchen, laundry room, and bathrooms), and it came out to exactly 50. At the good ole Home Depot there was a value pack with exactly 50 knobs for $50. So that pretty much made our decision for us. (I had been leaning toward all knobs for the simplicity anyway)
After a quick and easy installation:
We had this:


I didn't get any laundry room pictures, but here are the two bathrooms before-and-afters.

Sunday, May 29, 2011
Lighting changes everything
I am going out on a limb here and saying that this is probably my favorite change we've done to the house so far. That may not be fair to say, because the breakfast nook's board and batten and window shades and accessories and new wall art all have done their part. But it wasn't until we changed the lighting that it all really came together for me.

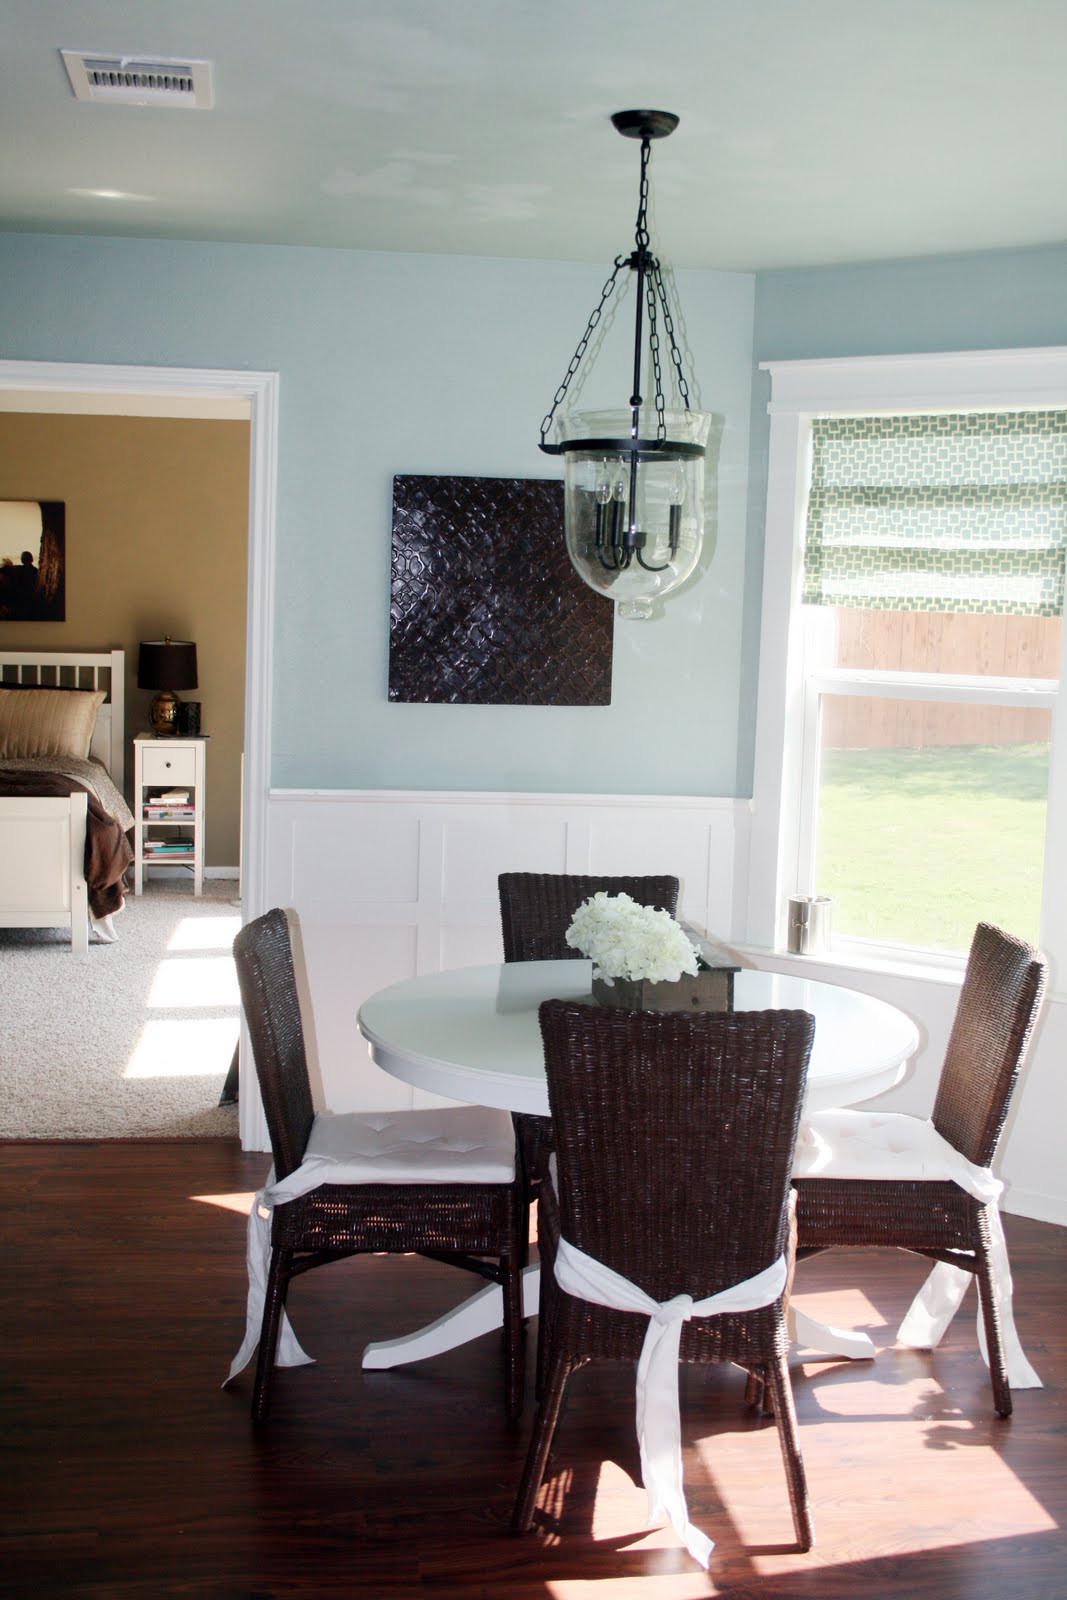


I got this light from Overstock.com. It looks identical to this Pottery Barn favorite. Seriously, identical. I have compared pictures over and over again, and everything matches up. Except the price. The Overstock light was over $100 cheaper! Score.
I am telling you, I squealed once we put this light up. It elevated the entire space and make everything look so very "Pottery Barn." Which, you know, is my ultimate design goal in everything I do, right? ;)


We are getting so close to being "done" with all the details in the main living space (the entry/living room/kitchen/breakfast nook). The only thing left is to replace the two pendant lights above the bar and the kitchen light (both can be seen in the picture directly above, on the left).
I ordered the pendant lights yesterday (and got a GREAT deal on those too, which I will tell you about once they come in). Then my dad has promised to help us install recessed lighting for my birthday (June 25). I want to install four recessed lights in the kitchen area to replace that one big light.
Of course, I'll be sure to post all about that as it happens! But for now, I am just basking in the glory of my new light fixture, that I just love (By the way... I love the light fixture, if I hadn't mentioned it yet).
Oh and just for fun, a little before-and-after action for ya:

We've come a long way, baby :)
An $11 solution...
So let me fill you in on how the decorating process works for me: a lot of the time, I see an inspiration picture in a catalog, and then I basically find a way to recreate it in my own home. Sometimes though, an idea just pops into my head and then I have to set out to find it (if it even exists!).
Thats what happened with this wall:

I knew I needed something dark to bring contrast to the white woodwork and light walls, to keep it all from reading to "pastel." In my head, I envisioned a fairly large square-shaped dark wood carving of some sort. Easy enough, right? Well, how exactly do you google that? Not as easy as I thought. And I searched the wall art at every home decor store I could think of, with no luck for months. Seriously, where do I come up with these ideas?
Then one day I saw this at Kirklands:

Marked down from $29.99 (good price) to $10.99 (great price!).
What? Its not wood? Well, I figured a little spray paint could create a little "faux wood." And if not, oh well! Its only $11.
So after a coat of the same brown spray paint I used on the kitchen chairs, I had this:

Looking a little one-note, eh? I thought so too. So I decided to bust out the ole acrylic paint in a slightly darker shade and fill in the flower design to give some depth to it. And I ended up with this:

Its not perfect, but I think it gives the illusion of carved wood. And its just the right size for the spot:


So there is my $11 solution for an empty wall. And all of this is leading up to a very exciting post about another new addition to our breakfast nook, coming up next!
Tuesday, May 24, 2011
One snail's journey
Also could be titled "one sofa table's journey." (Melodramatic much?)
The first time I blogged about our entryway, this is what you saw:

Those of you very observant types may have noticed a change to the bottom shelf of the table when I blogged about our new light fixture:

Here's a closer look:


Those of you very observant types may have noticed a change to the bottom shelf of the table when I blogged about our new light fixture:

Here's a closer look:

I just wasn't feeling the brown storage boxes that I had there originally. They looked kind of dark and dingy compared to the rest of the elements here, which are very light and airy, and even somewhat elegant. Plus this move got me really into being super-organized in my closets/drawers/cabinets (which I am planning to post about sometime soon), so I decided to use the storage boxes elsewhere.
I really struggled with trying to figure out what to put in place of the boxes. To be honest, I am still not completely happy with it and will more than likely change it once I find something that better suits the space, but until then, here's what I came up with.

The two silvery squares hold candles. I bought these months before we ever moved because they had that "light and airy" look that I knew I wanted for the new house. Honestly, not my smartest purchase ever, because I just haven't felt like they really go with the rest of the living room (where I have used more old-world rubbed bronze elements than I had originally anticipated). To be honest, the only reason these are now in this spot is because I want to use them somewhere so I can feel like I am getting my money's worth for them.
I bought this teal box from Marshall's basically as a space filler. I bought it with the intention of spray painting it white, but once I put it there, I liked the way the color worked, so there it stayed.

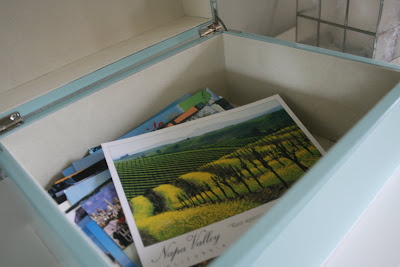
When I go on vacations, I collect postcards. I try to get a postcard from every place we visit on a single trip (museums, cool restaurants, etc). Its a super-cheap souvenir, and helps me remember where I've been. So my little collection has been sitting in a paper bag in a drawer for years now. My collection is finally growing to a size where it needed a true, dedicated spot for it. This teal box is now that spot. I love the way it elevates the postcards to more of a showpiece, rather than just junk sitting in a drawer :)
But wait. Isn't this post titled "One snail's journey" ? We haven't even talked about a snail yet. Oh yes, here he is...

This snail was my attempt to be like my home decor blogger idol Sherry (from Young House Love). She's got quite the collection of white ceramic creatures of all types (dogs, rhinos, rams, horses, squirrels....you get the picture). It looks so very chic, in a kooky sort of way. So when I saw this snail at Hobby Lobby, I figured I could try my hand at my very own white kooky animal accessory. (He originally was a bronze color, and I spray painted him white.)
This is one of those lessons of to-thine-own-self-be-true. It wasn't that I didn't like Mr. Snail, it just didn't feel like me. I'm not really a kooky type. I am more of a white ceramic flower type, rather than a white ceramic rhinoceros type. Especially for this space. I just felt like it was a "one of these things is not like the others, one of these things just doesn't belong" type moments...
Luckily, I had the perfect spot for Mr. Snail. A place you have already seen him before.


I feel like he fits in much better in the porches' more casual environment. He was a little stark white when compared to the creams of the pillows and accessories out there, so he got yet another coat of spray paint and now is a lovely "almond" color.
As for what replaced him on the entryway table. Well, its still a work in progress. I bought some shiny white decorative balls, which I like for the elegant beach vibe they give off without being too literal. I placed them in this glass bowl that I already had as a temporary solution (I don't feel like it is the right proportion size-wise to the teal box). So I am on the lookout for something that really pulls the look together. I'll let you know once I finally figure it out.

Subscribe to:
Posts (Atom)
